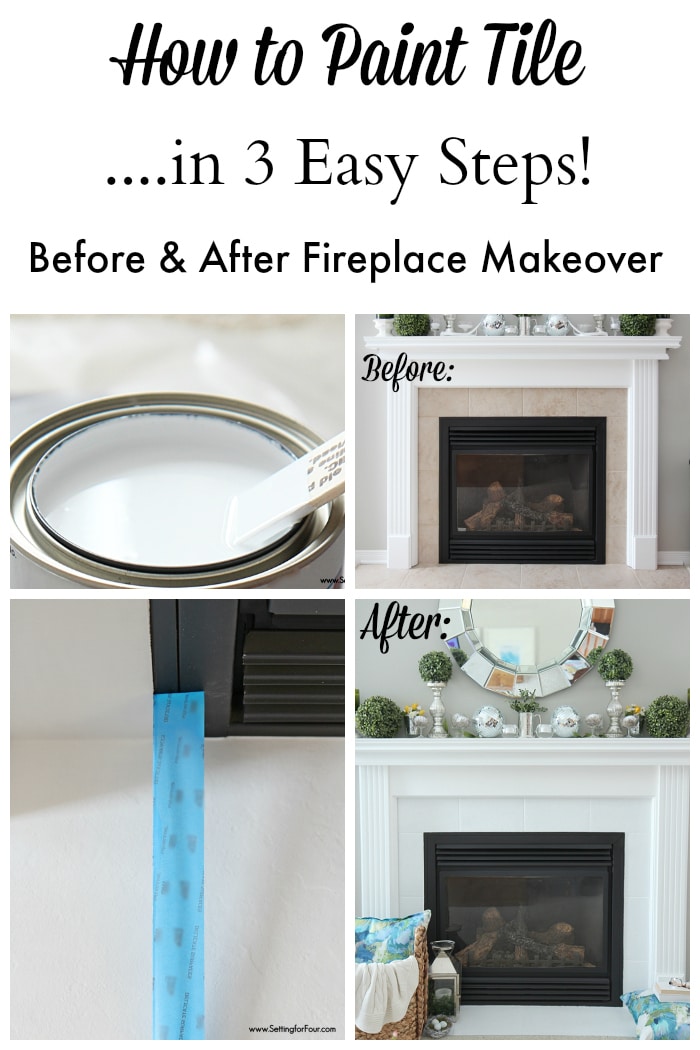
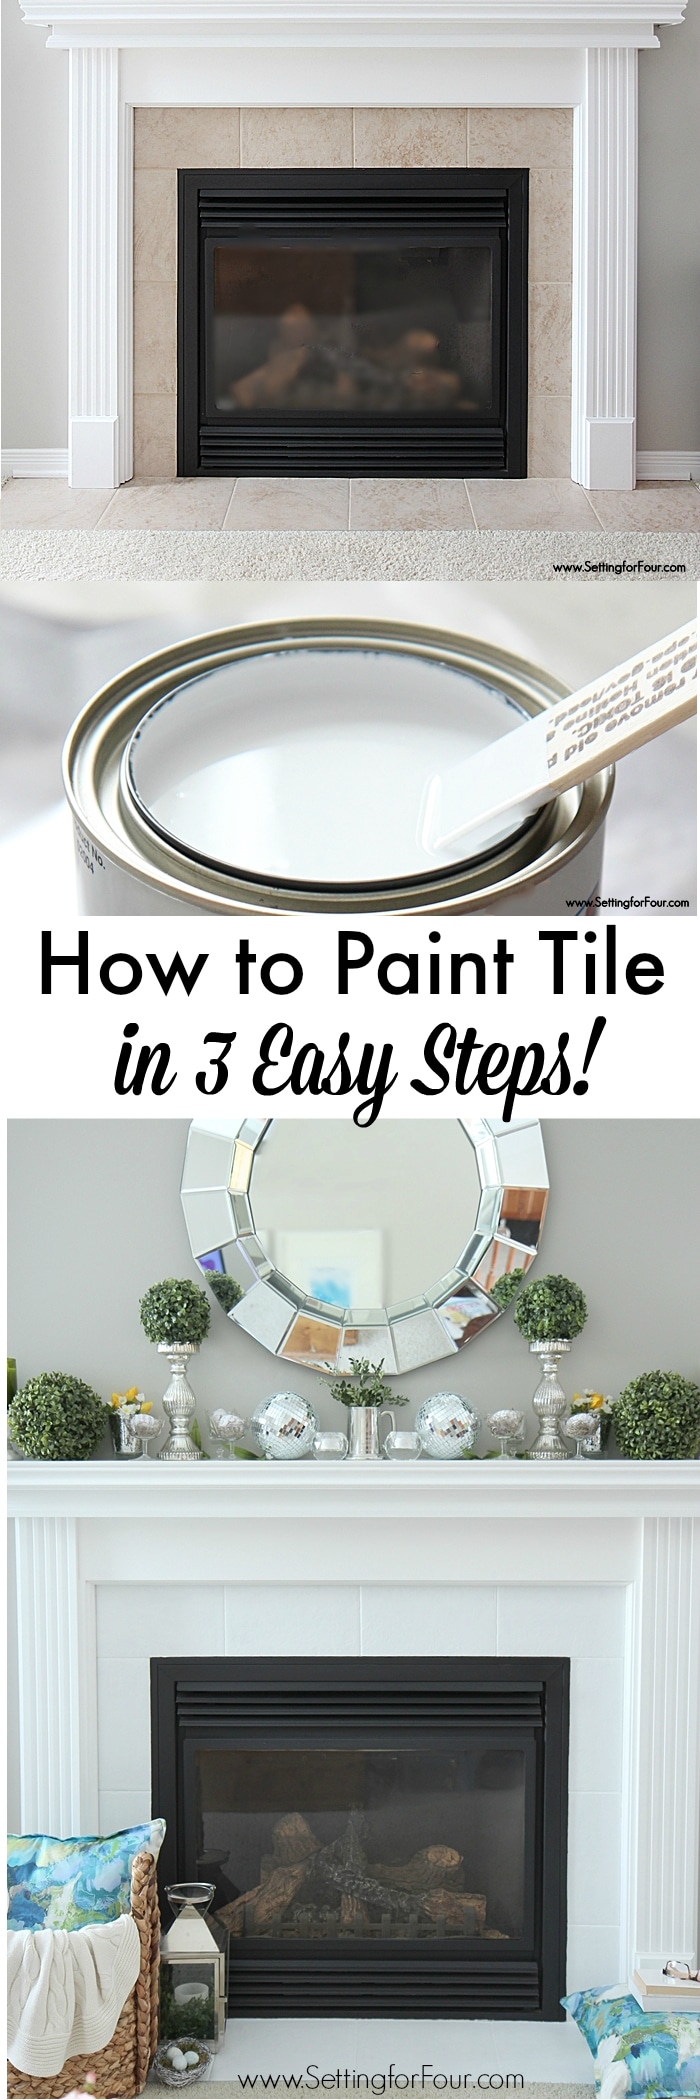
How to Paint Tile – Easy Fireplace Paint Makeover
Discover how to paint tile for an easy fireplace paint makeover!
Can you paint tile? Yes you can!
I’m sharing the full DIY instructions and the supply list to paint tile.
This painted tile makeover is so quick and easy- just 3 steps and no sanding!
It was so much easier than I thought it was going to be – and I love how it turned out.
You’ll love this DIY tutorial if you want to update outdated tile. It’s a quick, easy and inexpensive DIY project.
affiliate links included in post – full disclosure statement available here.
Why We Painted Our Fireplace Tile Instead of Replacing It
Giving our living room electric fireplace surround, hearth and mantel a full makeover has been in the plans for a while.
We’ve been busy with other room updates and painting walls but haven’t done a full remodel of the fireplace yet.
Since the fireplace is in great shape and we love the size of it, we decided on keeping it for now.
However the honey oak mantel and beige fireplace tile is boring and dated.
So we decided on painting our fireplace tile – no demo required!
We kicked off our fireplace makeover by painting the dated honey oak wood mantel a beautiful white color – a simple change that instantly lightened and brightened the living room.
Next, we updated the dated beige tile surround and hearth using a no-sanding, three-step process. It was surprisingly easy and made a huge impact.
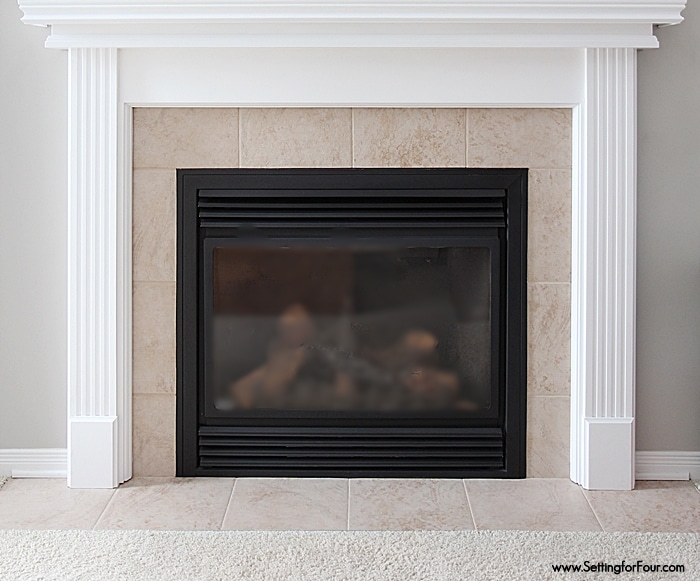
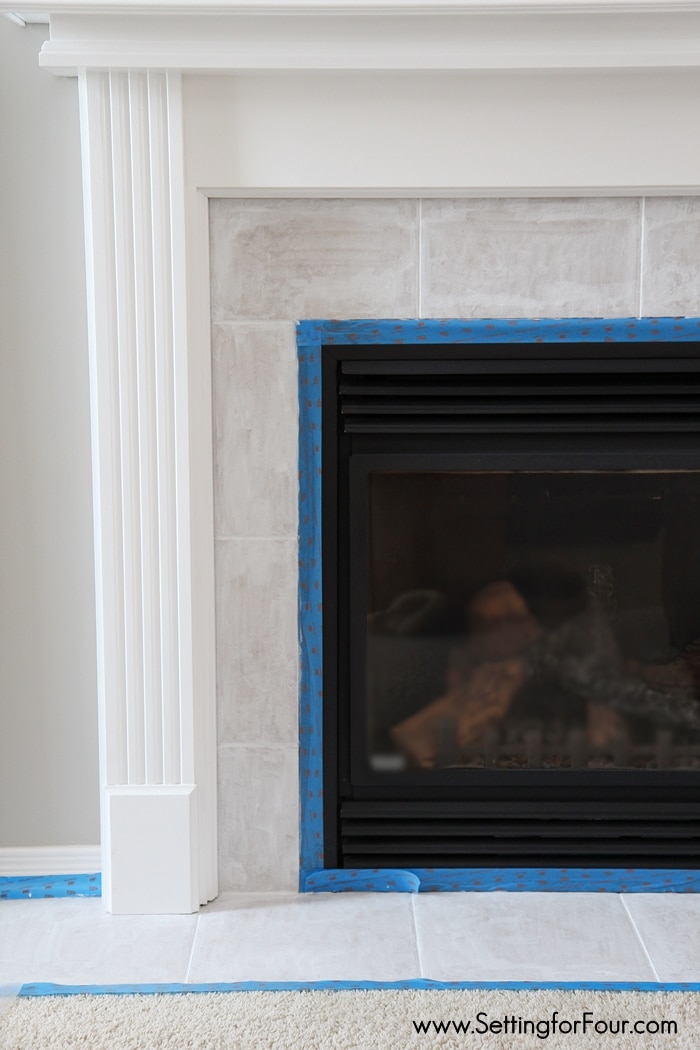
Fireplace Before – How Our Fireplace Looked With The Beige Tile Surround
This is how the beige tile looked before we painted it.
It doesn’t coordinate with the wall color or with the white mantel.
It’s outdated and blah looking.
Painted Tile Fireplace Supplies
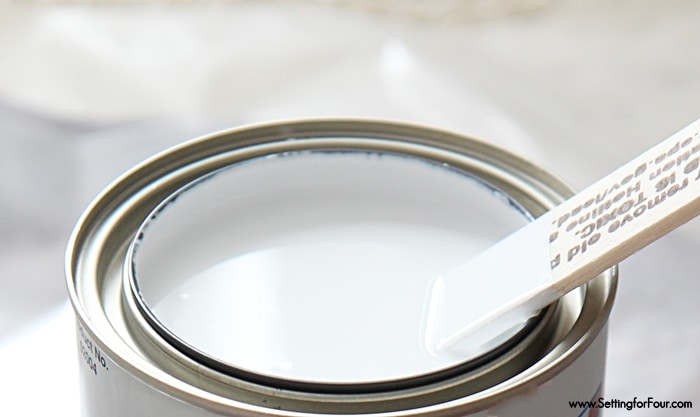
- Primer – I get a lot of questions about the paint I used, so I want to clarify that I didn’t use any other type of paint to top this. I only used this white primer. It’s a primer, paint and sealer in one. This primer is designed to resist blistering and peeling.
- Painter’s tape – this painter’s tape prevents paint bleeding and it doesn’t remove the paint from the metal fireplace insert.
- Paint brushes – I used the 1.5 ” brush and the 1/2″ brush. These pro grade paint brushes are the perfect size and shape for applying the tile paint. They don’t leave brush marks and give lots of control around the corners! They also lay the paint onto the tile well so I only had to apply 3 coats of paint to get complete coverage!
- Non residue cleaner
- Painters plastic drop cloth – optional. This plastic drop cloth will protect your flooring.
Tile Paint No Sanding Required!
- I did NOT SAND the tile at all! This saves lots of time and prevents mess!
- The paint I used is a primer, paint and sealer in one and it’s designed to adhere to tile.
- Always paint a test patch first on a spare tile or in a small bottom corner of the fireplace tile, to make sure it will apply to the surface of your tile!
Read below for the full instructions on how to paint fireplace tile.
Step By Step Instructions On How To Paint Tile On Your Fireplace Surround
Step 1. Clean The Tile Really Well!
- It’s so important to prep the tile properly to make sure the paint will adhere and won’t peel off!
- Wash the tile before painting to remove any dirt, dust or grease.
- I made up a mixture of 2 cups of warm water and 1 drop of this soap that’s great for removing grease in a small plastic container and wiped down the tile with a cotton cloth and the soap mixture.
- I didn’t use any other cleaner.
- I didn’t use a sponge because I it’s hard to completely rinse out a soapy sponge.
- After cleaning the tile I gave the tile a final ‘rinse’. I wiped it all down with a slightly wet cotton cloth using just water to remove the excess cleaner from the surface, and let it air dry. I used a new cloth to rinse to make sure it had no soap residue in it.
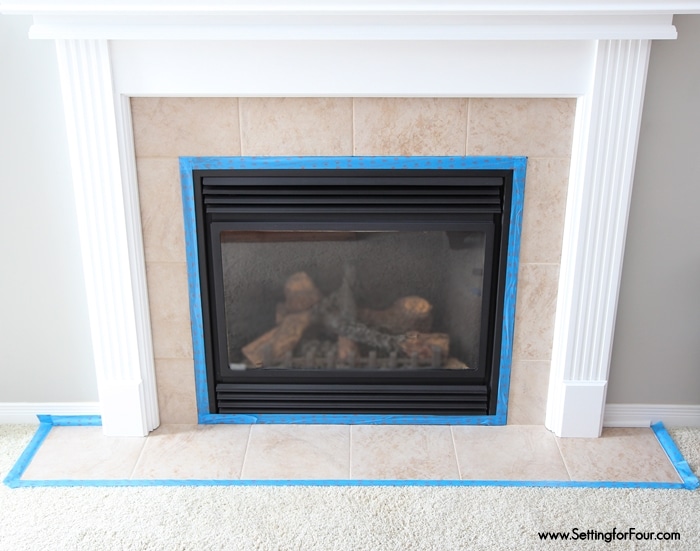
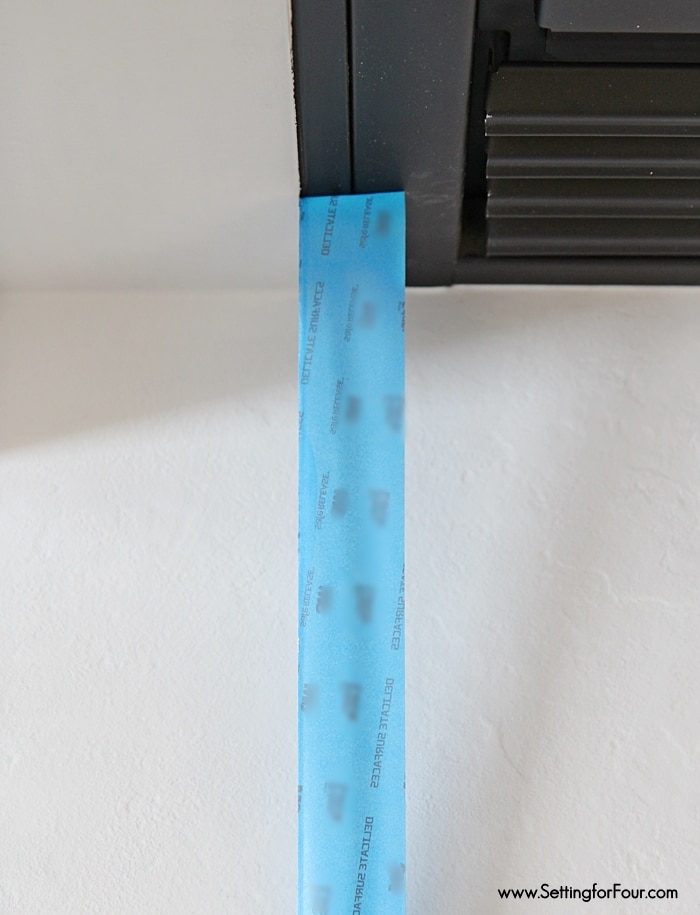
Step 2. Tape Off The Tile Portion
- Tape around the entire tile with the painter’s tape.
- I even taped out the hearth tile by applying the tape right onto the carpet!
- Run your finger over the edges of the tape thoroughly to seal it.
Step 3. Paint The Tile
- Paint the tile and the grout lines using the paint brushes listed above and the white tile paint!
- I only used this primer paint – no other paint!
- I did not use a paint roller or paint tray.
- The first coat of paint will look streaky. That’s okay!
- Our tile took 3 coats to cover. Each coat dries quickly though so I was able to finish in 2 days.
- Make sure you follow the instructions on the can of primer to let it completely cure in between coats and to fully cure before using the area. This will ensure a durable finish!
- The paint sheen has a very soft satin look.
- Not completely matte, just a very soft shine – it’s perfect! It’s in between a matte finish and a semi-gloss.
How The Painted Fireplace Tile Looks Like With 1 Coat Of Paint
This is how the fireplace tile looks with 1 coat of paint.
It looks streaky and you can see some of the beige tile color.
With another coat or 2 of paint, the beige tile will become completely covered.
When you are finished painting and the paint has completely dried remove the painter’s tape.
Love that there’s no paint seeping!
Nice clean edges!
Also, no paint has been removed from the black fireplace insert!
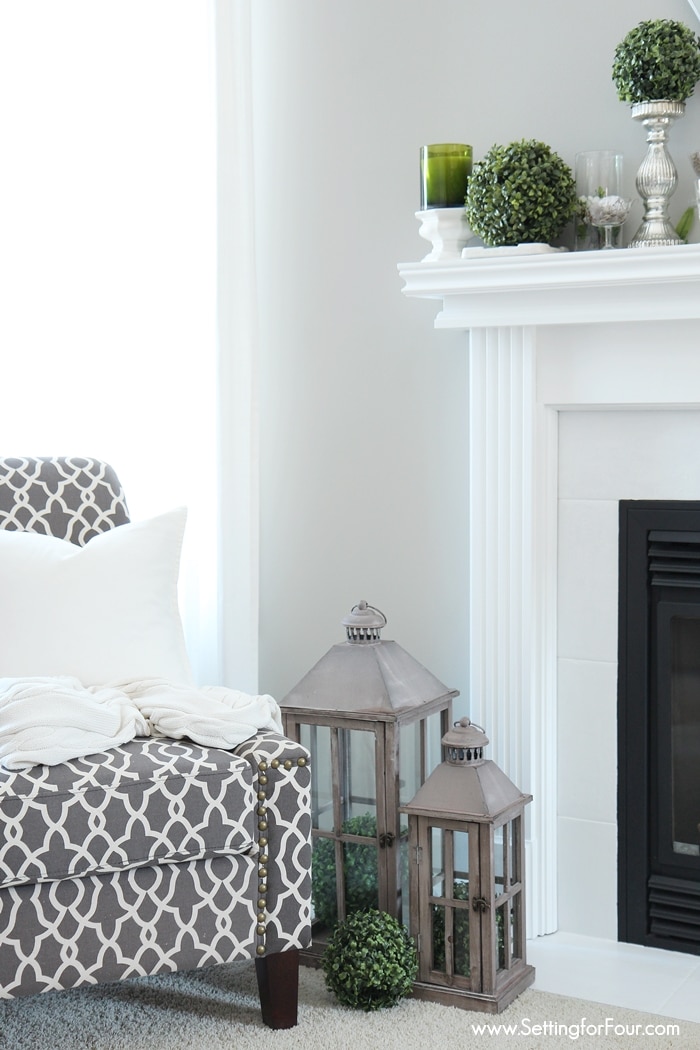
We love it – no more boring beige!
This tile makeover is fresh and bright.
I love the white against the black fireplace insert.
Our painted fireplace tile fits in so much better with the rest of our living room now!
As a lover of neutral colors and timeless design this paint makeover really makes me happy!
I also really love how my mantel decor absolutely pops now with the entire fireplace painted out in white.
Fireplace Before
Here is how the beige fireplace tile looked before painting it white.
So boring and dated!

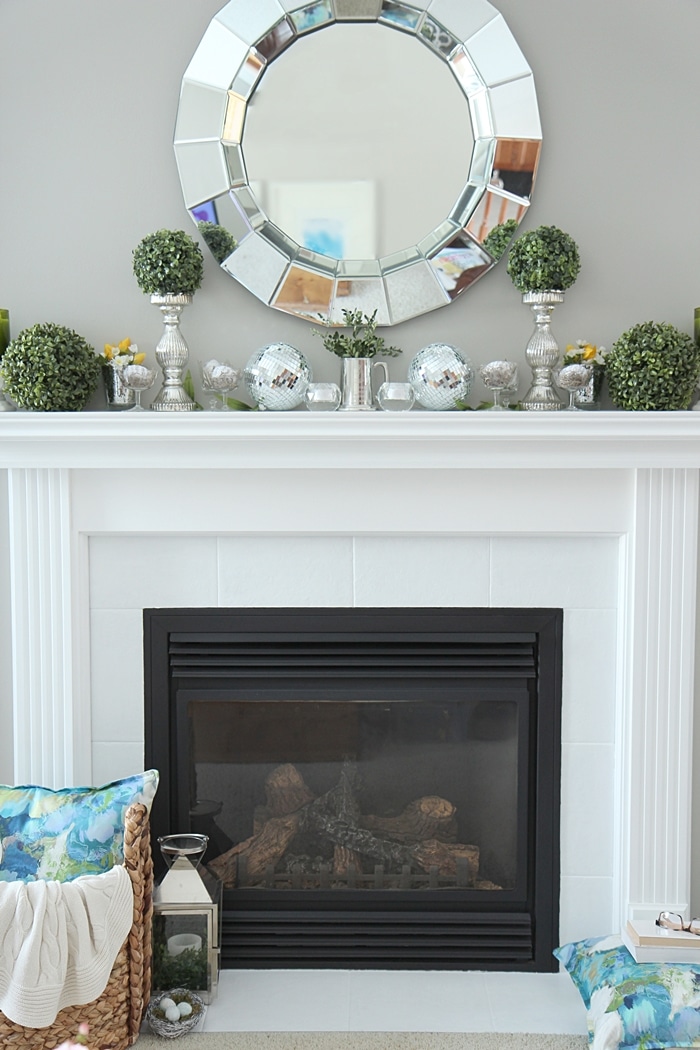
Fireplace After
This is how the painted tile looks after the quick makeover!
It’s updated, fresh and timeless looking.
This is such a quick, easy and affordable living room makeover!
Painted Tile Fireplace FAQ
Here are answers to questions I’ve been asked about this painted fireplace tile project.
1. Did you seal the tile as a final top coat?
No I didn’t add any other sealer product! This paint is a sealer! It’s a primer, paint and sealer all in one!
2. Can this work with porcelain tile?
I’m not sure, our fireplace tile is ceramic. You’d have to check the label to see if it works on porcelain tile
3. Does this hold up to kids and pets?
I don’t have any pets that walk on the tile hearth and our kids don’t either. The hearth and fireplace itself is not a high traffic area.
Be sure to let the paint fully cure in between coats and after the final coat to make sure it’s as durable as possible.
This paint does touch up easily, so scratches can be hidden!
4. Will this scratch, chip or crack?
I’ve had a few minor scratches on the hearth tile from candle lanterns that I placed on the hearth tile.
I just painted over the scratches with the same primer paint that I used on the tile, and the scratches are completely eliminated!
The tile surround area has shown no scratches at all.
There have been no paint chips or cracks with the painted tile.
I recommend used these magic eraser sponges to remove light marks on the tile from candle lanterns or other decor.
Also use these felt pads on the bottom of decor to prevent scratches.
5. Will this work on wall tile?
It may would work on wall tile too, but I haven’t tried it. I wouldn’t use it in a shower though – it won’t hold up to moisture. To paint shower tile or bathroom tile I would use with an enamel or epoxy paint that’s designed for high moisture and high humidity.
I’ve heard great things about this tub & tile refinishing kit to paint shower tile.
6. Will this work on cracked tile or tile missing grout?
I haven’t tried it but you can try to repair cracked tile with paintable caulk to fill in and smooth cracks as well as missing grout. Then apply the primer paint.
7. My tile is high-gloss – will this paint technique work?
For high-gloss tile I would lightly sand the tile with a sanding block to give the paint something to adhere to and be sure to remove all the dust from sanding before starting to paint the tile.
Like any paint project , success is all about the preparation of the surface.
You could also use this strong bonding primer that is meant for glossy tile.
8. Can you paint ceramic tile backsplash in a laundry room?
I haven’t tried it in a laundry room. The paint I used is not intended for any surface subject to immersion or prolonged contact with water.
You could try this strong bonding primer and this tub and tile paint.
9. How long does painted ceramic tile last?
I painted my fireplace tile 5 years ago and it has lasted. It still looks beautiful! I have had a few scratches from placing lanterns on the hearth area but I easily fixed them by touching them up with the same primer paint I used to paint the tile. Touch ups completely blend in too!
10. Can you paint fireplace tile black?
Yes, you can! You can prime the tile with this primer then paint the fireplace tile black with Sherwin Williams Tricorn Black.
SW Tricorn Black is a beautiful, popular and on trend black color with no undertones, so it coordinates with all other colors and won’t clash with furniture or flooring!
11. What kind of paint do you use on a tile fireplace?
This is a water based interior and exterior bonding primer paint. It has low odor.
It sticks to all surfaces without sanding and has super adhesion. It is also high hiding and is topcoat ready in 1 hour!
12. What kind of paint can I use to paint over ceramic tile?
The best paint for ceramic tile is a specialized tile paint, epoxy paint, or a high-quality acrylic latex with a strong bonding primer. Epoxy or two-part systems work best for showers/floors.
Premium acrylics like Sherwin-Williams’ Emerald or Benjamin Moore’s Aura Bath & Spa (for damp areas) are good for backsplashes, but always prep with a bonding primer like this strong bonding primer for success.
13. How to modernize a tiled fireplace?
If you can’t replace a tiled fireplace, then paint the tile!
You can modernize the tile by replacing it with a quartz, quartzite or marble surround.
I recommend matching the quartz in the kitchen for a cohesive look.
You can also modernize the tiled fireplace by replacing the tile with a plaster fireplace.
Also a popular trend is a natural stone fireplace that extends up to the ceiling and adding a wood mantel.
14. What is the downside of painting tile?
The only downside is that after the tile is painted it’s difficult to remove because the primer has high adhesion. So I don’t recommend it for renters unless they get permission from the landlord to paint the tile. Then it doesn’t have to be removed.
15. Do you have to sand ceramic tile before painting?
No you don’t have to sand ceramic tile before painting it unless it’s a high gloss tile.
If the tile has a glossy finish you should sand the tile to remove the glossy surface and to give the primer grip to adhere to.
16. Can I put peel and stick tile over fireplace tile?
Some peel and stick tile can be applied directly on top of fireplace tile but you have to read the instructions on the peel and stick tile!
17. Can I paint over fireplace tiles?
Yes, you absolutely can paint tile around a fireplace for a fresh look, but proper cleaning and priming with a durable bonding primer are key for a lasting finish. The process involves cleaning, taping off surrounding areas and priming 3 coats for durability and coverage.
PIN THIS AND SHARE IT WITH YOUR FRIENDS!
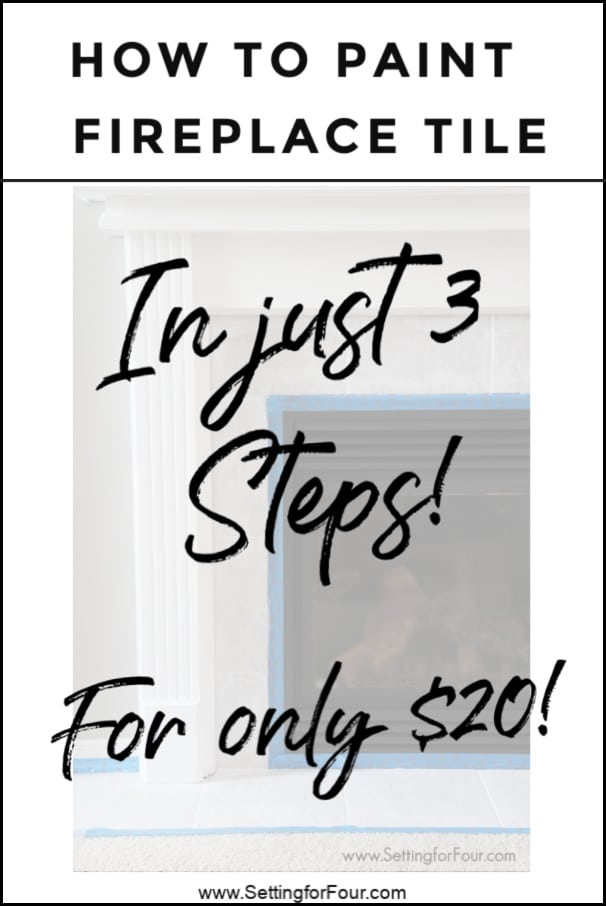
Affordable Living Room Makeover For Just $20
When I painted the fireplace tile the supplies cost only $20.
This is such an affordable DIY home project!
This is a great room makeover project for anyone on a budget or anyone looking for a quick, easy fix.
This DIY project can be done as a quick fireplace makeover before replacing the fireplace surround with natural stone or adding a micro-cement or plaster fireplace or replacing the fireplace tile with quartz or marble.
Final Thoughts on Paint Tile Fireplace
It’s so quick and easy! I love how it turned out, I would do it again in a heartbeat!
Painting the fireplace tile has made such a big impact in our living room and instantly updated the space!
5 years later it still looks beautiful.
I’ve had to retouch a few scratches in the tile, but it’s quick and easy to touch up.
I highly recommend this painted tile DIY project to anyone looking for a simple fix and easy way to refresh ugly, boring and dated tile!
Ideas on how to pick paint colors for your home
- 5 Ways To Create A Whole Home Paint Color Scheme
- How To Identify Paint Color Undertones – To Choose The Right Color
- How to Pick Paint Colors With Confidence!
- Paint Tips – How To Pick The Perfect Paint Sheen
- Top 50 Bestselling Paint Colors At Sherwin Williams
- 5 Best White Trim Paint Colors
- Top 50 Exterior Home Paint Colors From Sherwin Williams
- The Best Greige Paint Colors for a Timeless Home
- The Paint Color Trends That You Need To Know!
More Paint Color and Decor Ideas
- How to paint a brown wood fireplace mantel in 3 easy steps!
- How To Cover An Ugly Carpet
- 9 Ways to Update Your Fireplace With Paint
- Top 50 Exterior Home Paint Colors From Sherwin Williams
- Top 50 Bestselling Paint Colors At Sherwin Williams
- Agreeable Gray Undertones & Coordinating Colors
- Online Design Services & Color Advice
- Behr Back To Nature Paint Color – Color Of The Year 2020
- 7 Ways To Make A Small Living Room Feel Larger Instantly!
- How To Create A Cozy Living Room
- The BIG Mistakes You’re Making Choosing A Roof Shingle Color
- How To Arrange Furniture With An Open Concept Floor Plan
- How To Arrange Furniture In A Small Living Room
- 7 Ways To Make A Small Room Feel Larger Instantly!
This is a great makeover. You are right it really did make a brighter and fresher difference. The space seems more open and airy now. Thank you for the tutorial.
I’m glad you like my tute Tracy and thanks for the compliments!! I wish I had done it sooner – we are really enjoying the fresh update!
Can you then paint a color over the base coat? and, if so, what type of paint would you use? Thank you!
I’m not sure Debra – I haven’t tried that! Perhaps what you could do is paint a spare piece of tile you may have lying around with the white base coat then paint your color on top and see how it works. Good luck!
Did you only use the Zinsser paint, or that as a base coat and a different paint on top?
I only used the Zinsser paint as described in the tutorial! Hope that helps!
Thanks so much Tracy!! You’re exactly right – it makes my whole living room seem bigger and brighter! I love when a small inexpensive change like this makes a huge impact!
Is this paint okay with high heat from a functioning fireplace?
Hi Katy – Check with your fireplace manufacturer!
Love it! Also love the added clean look of the shiny silver. Thanks for sharing
Blessings~~~
You’re welcome Sandra! Thank you for your sweet thoughtful compliments!! Painting my fireplace has made such a huge difference to my living room!
Hi, Heather ~ I L-O-V-E this project! And, oh, how I adore the two words: “no sanding.” :0) I’m doing this project this summer, and kicking builder-grade beige to the curb! Thanks so much for sharing!
Yay – I’m glad you like my post!! You’ll love your fireplace after Tiffany! It makes such a huge difference to the whole room!! I honestly wish I had painted mine earlier! Let me know how your’s turns out 🙂
Heather, did you only use the primer/sealer (no actual paint?
Thanks
Yes Julie – just the primer/sealer! No additional types of paint! The white color of the primer/sealer is gorgeous!
Heather this is a great project and I want to try it on ours. Was it hard to get the primer to match the existing white on your mantel?
Hi Kathy! It matches perfectly to our white mantel! I’m so glad you like my post and painting tip! xo Heather
Did you also paint the grout too? I can’t tell by the pictures if you did or not. We got a slate grey color and want to refresh our fireplace that oddly had the same color as yours.
Yes – I repainted the tile and the grout! It still looks amazing – I’m so glad I did it!! Have fun painting your fireplace Pamela! 🙂
I think I am going to copy your fireplace look, love it! also, what colour grey did you use on your walls?
Hi Marci! I’m glad you like my fireplace makeover!! My grey wall color is Sherwin Williams Mindful Gray! It’s a gorgeous color!
One word – GORGEOUS!! Love this project! Definitely putting this on my project list!! One quick question – Is the tile paint the same white as your mantel?
Hi Aimee – I used different paint but it’s the same color of white! I’m so thrilled you enjoyed my post! Happy Summer!
Do you think this method would work on marble?
I really don’t know if it would or not Keri….I’d ask someone at Home Depot if they may know if it would work. Good luck!
Heather, I’d like to paint a tile kitchen backsplash. It is done in a black square shiny tile. There is an accent tile that I really dislike in the center. Will this paint work on a glossy finish tile as well?
Was going to ask the same question…a tearing out of the backsplash isn’t in the budget now, but yikes, I don’t like the backsplash in the home we just purchased! We even have occasional glass tiles to paint over…wonder if it will work!
Yes it does. I’ve done it in a kitchen and a bath tub/shower surround.
It looks fabulous! I recently moved into a new house and need to update two fireplaces! I have my work cut out for me. I love, love your round mirror. Where did you get it?
This is great! Do you know if they let you had color to the type of tile paint you used? We have a fireplace that is tiled but we don’t want it all white. We would like a medium grey color. thanks!
I’m not sure if you could tint it or not since I didn’t do that Kaci – but I guess you could buy a can and try to tint it! Might work!
Hi Heather,
Thank you so much for sharing this tutorial! I followed it this weekend and painted over some dark green tile. My fireplace looks so much better. It completely changes the feel of the room.
Thanks Again!
Tiffany
AWESOME!!!!! Please send me a photo of your tile Tiffany!! ( [email protected] ) I’d love to share it on facebook! I’m so THRILLED that you followed my tutorial and you love the results!! Soooooo excited for you! 🙂
I only wished my Husband had seen this before he used engine block spray paint on our bathroom/bedroom fireplace. So many fumes and overspray (although it was just dried dust by the time it hit anything). He choose this paint because the tiles get warm from the heat of the fireplace. Does the paint you use handle the painted tiles being heated?
Thanks so much!
Yes – this paint works for a fireplace – I haven’t had any problems with it being heated at all Tracy! It still looks like I just painted it yesterday too – no flakes or chips. So sorry to hear about the fumes and over spray you experienced! My tutorial has no fumes and no overspray or mess. Thanks so much for visiting Tracy!
Hi Heather – wondering how the paint has held up? We use our wood burning fireplace a lot and wondered if you thoght the paint would peel or scratch if were putting wood down on the painted tile?
Thanks,
From another Heather
Hi Heather (great name!) The paint has held up perfectly! No chips or scratches. Our fireplace is electric so I don’t put wood on it all the time, but I do put lanterns on it and birch logs for decor and have had no scratching. I’m wondering if you apply a matte sealer/varnish type of application on top for an extra measure of protection if that would help? I’d go to your local home improvement store and ask them what they think just to make sure. The other thing you could do perhaps is to paint a spare piece of tile you might have lying around and sort of test it to see how it holds up after a couple of weeks. Hope that helps!
Do you use your fireplace often? I’m wondering if I were to do this would the paint hold up against the heat?
We use it often in the winter and has held up well!
How well does this paint your using stand up to the high heat temperature from the fireplace? Would it not melt away or cause a bad odour?
My fireplace is electric and it’s held up well!
Can you post a pic of the brushes you used? Thank you so much.
Hi Jackie – they are artists brushes and you can see pictures of them using the links in the post! I hope that helps! Thank you!
Hi Heather. Love the updated look. Can you use this same technique for my beige kitchen backsplash?
Thanks Kathy – glad you like the updated look on my fireplace! I’m not sure how this might stand up with a lot of scrubbing for a kitchen…I’d ask someone at your hardware store perhaps if they think it may work or if maybe you need to add a sealer on top! Good luck!
Hi! I love your makeover! Such a a difference! We have a similar mantle! How is it holding up to cleaning…especially the floor section?
Hi Ashley – it’s holding up super well! I just damp wipe the tile to clean it. There were a couple of small scratches on the floor tile, where I put my decorative lanterns, but they came right off with a Mr. Clean magic eraser! I’m soooo glad I painted it – looks so beautiful compared to the blah beige tile that was there!! Hope that helps!
That’s great to hear! Thank you!!
How do you make the paint smooth and not have paint brush marks.
Cynthi – the paint brushes I used – links in post – are the answer to no brush marks! 🙂
I so want to do this. Maybe, I am blind, but did you paiint the tile on the ground as well. It looks beige still? Look great. Thanks for the tuturial!!
Hi Janet – glad you like my post! Yes I painted the tile at the hearth of the fireplace the same way! 🙂
Thank you!! Just out of curiosity why do you use two brushes? Did it take a long time since the brushes are so small?
Hi Janet – I painted most of the tile with the 1.5 inch brush and the smaller brush was better at getting into some of the tight corners. No it didn’t take a long time to paint – the smaller brushes actually gave me more control so I wouldn’t get paint on the wood mantle. Hope this helps! 🙂
We are considering to paint our green ceramic tiles around our fire place, and we burn wood and there is quite a lot of heat when the fire is going. Do you think it would work for our fireplace ? Any suggestions would be great 🙂
I’d ask you local hardware, home improvement store about that Sandy! Our fireplace is electric not wood burning.
Thankyou for a very easy solution to transforming tile, I’ve had clients ask me if tile can be painted.
I’m so glad you posted this, I’ve been thinking about wanting to change my tile around my fireplace but I didn’t know you could paint it with the heat coming out right next to it. So glad to know there are no problems. I’m curious did you paint the grout too or leave that alone? Mine is a kinda beige-brown.
Yes I painted the grout too Lynn – mine was beige as well!
We just painted our walls mindful gray today and have the same fireplace! I was thinking he beige doesn’t match and this looks great! Did you have to put any sealant in top? I’m wondering if tiles on floor get marked up when people walk on them? Can you wipe them down when needed ?
Hi Kelly – I just used the steps that I posted in my tutorial. We don’t walk on the tiles below our fireplace but I do set baskets and lanterns on them. It wipes easily!
Your fireplace looks FAB! I am going to do paint my fireplace this weekend but would like an update if possible. Is this tile paint still holding up? Reviews online are not so good if used as primer but no reviews have been done regarding using as a paint only.
Yes – it’s holding up perfect Michelle!!
Hi Rose – the paint I used only comes in one color – white. But it’s a primer so you should be able to paint on top of it, but I haven’t tried that myself. Good luck and you are so welcome for the idea!! xo Heather
Please provide the exact name and brand of paint. At Home Depot I was shown concrete paint. Was told they had “no tile paint”.
Marilyn – the paint I used is in the supply list. Check it out! 🙂 Best Heather
So sorry to ask this same question, but I have read and re-read your instructions and I do not see the exact primer and paint, exact brand, sheen and color? (satin?) Would you please provide. Amazing job that I would like to try as well. Working with a salmon tile, yuck. 😉 Also, do you mind sharing your black fireplace insert? Thank you!!
Hi Lori – the products that I used are linked in the blog post! I don’t know where the insert is from. Have fun painting your fireplace tile!
I painted my mantle but I’m nervous to paint the tile surround. Will the heat cause the paint to crack on the tile?
I don’t know Jill. My fireplace is electric and doesn’t heat the tile.
This is what I am trying to do with my tile around the fireplace. I went to Home Depot and asked about this paint as I coudn’t find it myself and the guy said he didn’t have any specific “tile paint”. He sent me home with an interior Satin Enamel that is a Paint and Primer in one. I’m thinking this might be the wrong product to use?
Hi Debbie – I used the paint that I talked about and linked in my post so I don’t know if the paint you bought at Home Depot will work or not.
I ended up getting the paint you linked here. I think our fireplace looks much better now. But, here is the issue that I see. I can scratch it off with my fingernail, and we have dogs, so I haven’t let them on it yet, but I can’t keep the fireplace barricaded forever. Have you had any issues with this? Wondering if I should put another type of sealant on it? It does say full adhesion and hardness in 7 days. Did you wait 7 days before putting your decorations on it? Thanks!
Hi Debbie – I waited a few days before putting any decor on it. I haven’t had any issues with it, but I don’t have dogs. Perhaps you could put a clear varathane on top? I’d ask your local hardware store if that might work. I’m not sure if that would work, but perhaps it’s worth a try!
If I’m understanding correctly, you only used the primer/sealer and not a top coat? We’re getting ready to paint our fireplace and I love the way your looks!
I used the supplies and the tutorial in my post! Thanks for the compliment – we love it!
I’m you newest fan! We have the same fireplace and I thought about having a mason brick it, but I really love this! I can’t wait to get started!
Oh thank you Gina for your lovely compliments! So glad you like my blog and this tutorial! Enjoy your fireplace makeover!! xo Heather
Hi there – I am SO excited to have stumbled upon your post. Were your tiles smooth to the touch to begin with? Ours have some slight ridges in them that give them some more “natural look. “I am wondering how it would turn out if I were to follow your steps on stone that isn’t completely smooth. Thanks in advance!
Our tiles have a very subtle varied surface to make it look like natural stone as well. We love how it looks and how it turned out. So much better than the blah beige it was before!
Hi there, Our fireplace tile look exactly like your old one, so I am thrilled to see your post!
Have you used your gas fireplace since? This is my challenge in convincing my husband that this is a great idea!
We use our fireplace all the time! I’m so glad you like my post – thank you!
Very cool! We have a bathroom in our basement that is ‘fine’ but this may help improve the look of the boring beige tile on the floor. Since it says it’s a primer and you can use any topcoat I think I’m going to add a stencil to the top in charcoal to mimick the look of those cool patterned tiles. I’ll have to figure out a topcoat to protect it since it will be walked on. Any suggestions?
I’m not sure – perhaps you could ask your local hardware store what they might suggest? Sounds like you have a great plan with the stencil! 🙂
Have you ever stenciled on a ceramic tile fireplace surround? I am thinking of doing this but not sure if it would work or not. Also, if so, what paint do you use? Thanks!
Hi – no I have never stencilled on a fireplace tile surround. The paint I used is linked in the post! 🙂
Hi Heather, looks lovely! Now that some time has passed, has the paint project withstood the wear and tear of household activity? Just wondering if you’ve had any issues with chipping or cracking? Thanks!
Hi Kelly – it’s held up beautifully! I’m so glad I did it! I’m doing a blog post on how it’s held up – stay tuned!! xo Heather
would love to see a picture of how the gray and white looks. I was also thinking of trying gray/white.
I getting a new gas insert in mine in a couple weeks and I think I just found the solution for my out dated tile!! The link for the paint, you only used the primer/sealer in white – no actual paint? It looks beautiful!!!
Thanks Julie – we love our painted tile! Yes it’s paint/primer/sealer in one!
I’m so thrilled that you used my tutorial to paint your tile!! Isn’t it an incredible transformation? Thanks for sharing!! xo Heather
The hearth of our fireplace is tile and I would love to paint the entire thing but am worried about falling embers. Have you experienced this?
Hi Shaney! Our fireplace is electric so I don’t have experience with embers.
Hi Heather!
Dumb question, but did you just paint over the grout with this paint too?
Thanks!
Lauren
Hi Lauren! Yes I did – I painted over the grout! 🙂
Can you use this same paint around a wood burning fireplace? We have black slate tile, that is fine, but our house is light gray and white and it sticks out like a sore thumb!
I’m not sure! My fireplace is electric not wood burning. I would ask you local hardware store to see if it’s possible.
What is the Exact paint/ Primer that you used?
I used exactly what is in the instructions and supply list.
Could we have the paint you used tinted to match our off white trim?
I don’t know, I’ve never tried it! I’d message/email the manufacturer to ask them, I’m sure they will help you answer your question!
I love your fireplace and want to do this myself, but notice you mention a couple times you have an electric fireplace. Mine is gas. I have the same tiles you do surrounding my gas fireplace and am wondering if it makes a difference in terms of safety. Would you happen to know? The manufacturer is out of business…
Hi Lisa – I don’t know about that.
When you say “electric” fireplace do you mean gas fireplace? I have the same beige tile and juat finished painting my honey oak matle white and would love to paint my tile. My fireplace is gas and looks exactly like yours.
Hi Jen – No I don’t have a gas fireplace, our’s is electric. There is a difference between a gas and electric fireplace. Hope that helps!
hi Heather … this is amazing! We have beige tiles around our gas fireplace and were thinking of retiling. This saves time and $$$. Does the primer come gray too?
Thanks so much Elizabeth! Yes it comes in gray too!
You can see the gray version here: https://rstyle.me/+-ZOHFc41KSv1NXyHQxWgww
Hi Heather,
Can it be removed easily when needed? I live in an apartment and I am wanting to paint the fireplace but whenever it is time to move, I want to return to original condition.
Hi Jonie – I don’t think it can be removed…..maybe you can ask your landlord if you can paint it and leave it?
How long did you wait in between each coat?
I followed the dry time of the paint’s time instructions!
Does it still look this way? I’m debating on painting the tile around my fireplace but wondering how long it lasts…
Yes -it still looks this way and has lasted 5 years!
Hi Heather. Your fireplace project looks awesome! I am wanting to do something different with mine. If I showed you a picture, could you give me an idea? I would be so grateful. It is a real fireplace.
Sure! I help my design clients with their fireplaces often! Email me at [email protected] and we can discuss.
I am following you instructions exactly and using a Purdy paint brush not a roller. I just finished the 2nd coat and I can see the brush strokes pretty clearly. Are they noticeable on your fireplace with the 3 coats of paint? Would love to know and thanks for the idea.
I don’t have visible brush strokes on my painted tile. I used flat brushes that I listed in the supply list and are linked in the post, not a Purdy paint brush. You’re welcome for the idea! We love our tile makeover!
Hi Heather, this looks absolute great! I noticed you put in bold *You have an electric fireplace* why did you mention that and put it in bold? Was that a warning for something in particular?
Hi Marla – I just put it in bold because a lot of people ask me if I have an electric fireplace or gas fireplace! I have an electric fireplace. Hope that helps!
Yes that helps. Thank you so much!
Hi there! Love what you did! Do you really need to get those paint brushes? They are $40 for the two and wondering if I can find somewhere else
Cheaper! I so appreciate your links to everything you got!!
Using quality paint brushes results in no brush marks in the paint and a better look. Have fun painting your tile!
Hi again! I’m on my second coat of painting the mantel white. I’m still seeing a lot of brush strokes. I’m using the brush you linked. I’m not using the roller you linked because it left a kind of “wall” texture look! Any tips? Finishing third coat tomorrow! Thanks!!
How much of the paint did you need?
Not a lot! I didn’t use the entire can.
Hi! I recently used the same primer to paint our tile fireplace. I love the look! However, when I was removing the painters tape some of the primer peeled off of the tile. After 4 coats it peeled all the way down to the tile. So I was wondering, do you think it will be fine after the 7 day cure time the primer states? Or should I put some sort of sealer over the top?
Thank you!
Alison
Hey! I’m trying to click on the painters tape but it’s taking me to a dead end on Amazon! Which tape do you use?
Thanks!
Hi – this is the affiliate link: https://amzn.to/3i568Va
I was preparing to stucco over the multicolored tile on my living room fireplace when I came across your post. I followed your suggestions and my fireplace looks clean and fresh. I had the paint tinted Benjamin Moore White Dove and it looks amazing now. Thank you!
Oh fabulous! Thank you Janice for sharing your experience! I love Benjamin Moore White Dove and I’m so happy to hear that you tinted the paint to that gorgeous color! I’m so glad you love your painted fireplace tile! We still love ours to this day! xo Heather
I did this – used the same primer – mostly with a roller brush except for the tight areas. It worked SO well. I was so happy! My fireplace is in a north facing room so I did find the white of the primer to be a bit too harsh, so I painted over it with Sherwin Williams’ Alabaster, just normal paint, and it looks fantastic. No sanding, just cleaned the tile, then did the painting according to the directions on the primer can. I did need four coats of primer, but my tiles were a very dark grey so that’s likely the difference for me. Thank you so so much!
Fabulous! I’m so gad you love the results!
Hi Heather! Amazon no longer sells the first paint brush you mentioned 🙁 any other recommendations?
You could try this 2″ artist brush – it should work here is the affiliate link for it: https://amzn.to/3oLmRl9 Hope that helps!
Hi Heather. I’ve used both types of brushes. I’m on my third coat of paint now..and I still see paint brush streaks. I’m thinking I’ll need to do some sort of roller brush now, or just sticky tile the fireplace. It was the same Beige tile.you had, I bought the recommended paint. Any ideas?
The paint link takes me to a primer – what paint did you use? Large tile area on fireplace to paint black. Thank you!
That’s what I used.
Hi. I like the fireplace a lot. I have ugly, brown, “rough surface” tile on mine. I’d like to have it painted all white like yours. I don’t have a wood mantel. My question: Your fireplace is electric. Mine is gas and wood so it allows for a real flame. I don’t use wood anymore due to termite issues. I do use it with gas logs. It gets hot. Is the paint you used SAFE to use on my gas/wood burning fireplace?
Thanks.