Setting for Four

  • Online Interior Design & Paint Color Services
  • Interior Design Tips
  • Paint Colors
  • Home Decor Ideas ↓
    • Seasonal ↓
      • Spring
      • Fall
      • Summer
      • Winter
    • Holidays ↓
      • New Year’s Eve
      • Valentine’s Day
      • St. Patrick’s Day
      • Easter
      • Mother’s Day
      • Father’s Day
      • Halloween
      • Thanksgiving
  • Furniture & Decor Sales
  • Shop My LIKEtoKNOW.it
  • Christmas Decor Ideas
  • Gift Guides
  • The Holiday Shop – Festive Christmas Decor
  • About ↓
    • Welcome to Setting for Four Interiors
    • Contact
    • Privacy, Disclosure & Photo Usage Policy
  • Collaborate

DIY Beaded Sunburst Mirror Tutorial

by heather 80 Comments

2242 shares
  • 337

DIY Beaded Sunburst Mirror Tutorial – Beautiful Wall Decor Idea!

See how I repurposed a ceiling medallion and made my own DIY Beaded Sunburst Mirror! 

This is such a beautiful home decor and gift idea!

Learn how to make this gorgeous DIY Sunburst Mirror using a ceiling medallion and beads!

Includes a step by step tutorial with all instructions and supply list.

Perk up a wall in any room with this bead and paper craft idea.

Customize it with other colors too!
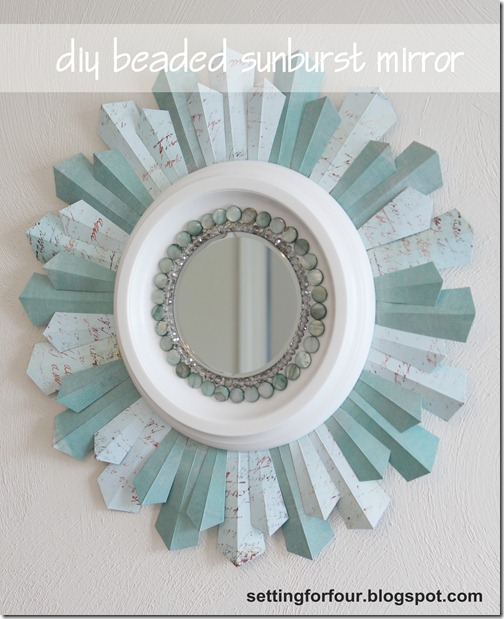
Beautiful Home Decor Idea! Learn how to make this gorgeous DIY Sunburst Mirror using a ceiling medallion and beads! Includes a step by step fun tutorial with full instructions and supply list. Perk up a wall in any room with this bead and paper craft idea. Customize it with other colors too!

If you like coastal decor make one in the blue and soft gray colors that I used. You can also use different color beads and paper to completely customize it!
Make several of these DIY mirrors to create a gallery wall!
  Beautiful Home Decor Idea! Learn how to make this gorgeous DIY Sunburst Mirror using a ceiling medallion and beads! Includes a step by step fun tutorial with full instructions and supply list. Perk up a wall in any room with this bead and paper craft idea. Customize it with other colors too!
Isn’t it gorgeous?
Beautiful Home Decor Idea! Learn how to make this gorgeous DIY Sunburst Mirror using a ceiling medallion and beads! Includes a step by step fun tutorial with full instructions and supply list. Perk up a wall in any room with this bead and paper craft idea. Customize it with other colors too!

DIY Beaded Sunburst Mirror Supply List

Click on the links below to shop the supplies:

  • 12 inch craft ring
  • 5 inch round mirror or use a larger mirror
  • Crystal rondelle beads – I used grey color
  • 14mm shell beads 
  • elastic beading cord
  • 10 inch ceiling medallion
  • 2 sheets of Scrapbook Paper
  • Hot glue gun
  • Scissors
  • 1 sheet white printer paper
  • Pencil
  •  Command strips to hang the mirror

Supplies to make a Sunburst mirror from Setting for Four

DIY Beaded Sunburst Mirror Tutorial

1. With the white printer paper make two templates for your sunburst rays.

Make one large template and one smaller template.

I just eyeballed the width and shape I wanted.

The large one is 4 inches long and the small one is 3 inches long.

Template for Rays of DIY Sunburst Mirror from Setting for Four
2. Cut out each template.

3. Using the templates, trace them onto the scrapbook paper to create several large and small rays.  Just trace around the outside edge of each template.

For double sided scrapbook paper – use both the back and front of the scrapbook paper to alternate the colors/patterns.

4. Cut out each sunburst ray. ( I made 20 large rays and 20 small rays).

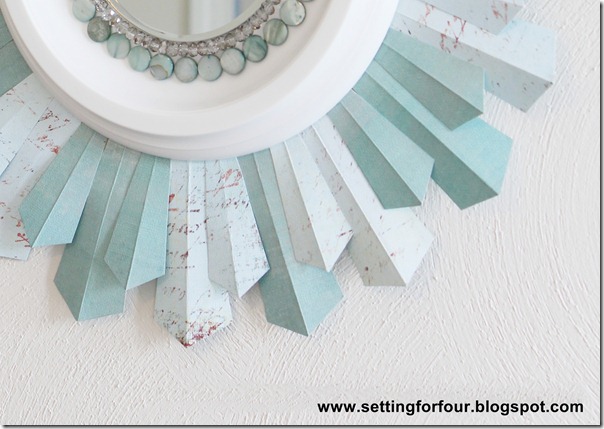
5. Fold each paper ray lengthwise to give each ray some dimension so they do not lay flat.  You can see what I mean in the picture below and in the first picture in this post.

6. Lay each ray around the ceiling medallion, in the manner you like, alternating small ones with the large ones, so you get an idea of how many to make.

How to make a Sunburst Mirrror from a Ceiling Medallion from Setting for Four
How to make a Sunburst Mirror from Setting for Four
7. With hot glue, attach the end of each paper ray to the wooden ring so the bottom of the ray is close to the inner edge of the wooden ring.
 8.  I attached the rays so that all the small paper rays were laying on top and all the large rays were laying underneath the small sized rays, like this.

Tutorial for Sunburst Mirror from Setting for Four

9. Attach the ceiling medallion with hot glue so that it is centered onto your ring of paper rays.

10. Attach mirror with hot glue onto the ceiling medallion so that it is centered too.

11. String the crystal beads onto the elastic beading cord.

Add as many crystals as is required to go around the outer edge of your mirror.  (I used 73 crystals).

Tie the elastic cord in a tight knot and cut the ends.  Gently pull one bead over the knot so that it is hidden.

12. Attach string of  crystal beads, using hot glue, around outside of mirror.  You do not need to glue down every bead…I glued the strand down in about 7 places.
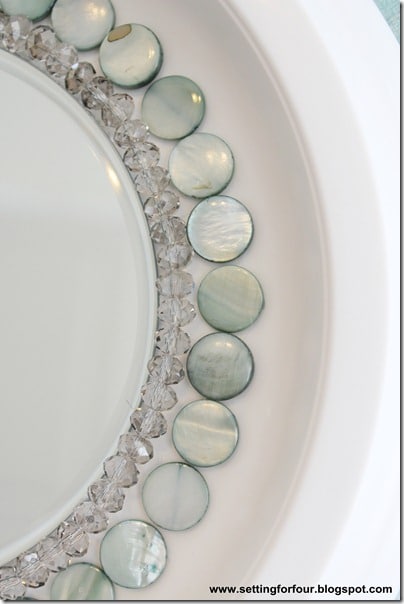
Beads used to make DIY Sunburst Mirror from Setting for Four
13. Cut the strands of shell beads to separate the beads.  Attach individual shell beads with hot glue around outer edge of crystals.  I used 34 shell beads.
I had to overlap slightly the last 2 shell beads to make them fit, but no one will see it!
Tutorial for DIY Sunburst Mirror from Setting for Four
14. Attach a command strip to the back of the wooden ring and hang the mirror.

That’s it you are done!

This was so fun to make!!!
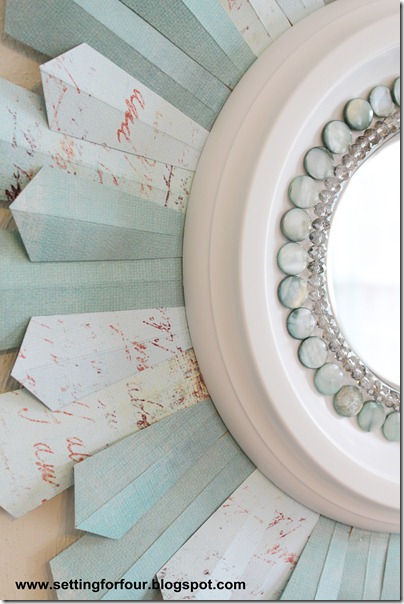
I love how it sparkles and the beautiful shape of the paper rays.
This would be a great gift idea too!
Teacher gift, birthday gift, Mother’s Day gift…..
Tutorial for DIY Sunburst Mirror from Setting for Four

I hope you enjoy your one-of-a-kind DIY sunburst mirror!!

Home Decor - DIY Sunburst Mirror Tutorial from Setting for Four
Make a Sunburst Mirror using Scrapbook Paper from Setting for Four Make a Sunburst Mirror from a Ceiling Medallion from Setting for Four

You may also like:

  • Small Bedroom Ideas To Maximize Space & Style
  • Inexpensive Ways to Make Your Home Look Expensive!
  • How To Arrange Furniture In A Small Living Room
  • New Bedroom Updates Juju Hat Wall Decor, Duvet Cover and Lamps
  • Repose Gray – Undertones & Coordinating Colors
  • Gorgeous Accent Mirrors – The Most Beautiful Styles & How To Hang Them
  • How to Create a Mirror Gallery Wall
  • How to Pick Paint Colors With Confidence!
  • DIY Wall Art Idea using Marbled Paper
  • Soothing Bedroom Color Schemes
  • 5 Design Tricks To Brighten A Dark Room
  • 5 Decorating Mistakes That Make Your Home Look Cluttered
  • How To Identify Paint Color Undertones – To Choose The Right Color
GET THE FREE BEGINNER'S GUIDE TO INTERIOR DESIGN & DECORATING!

Design secrets to create spaces you'll love!
By signing up, you agree to receive Setting for Four e-mails. Please see our privacy policy for more information. Although I'd hate to see you go, you may unsubscribe at any time. Your information will never be shared or sold to a 3rd party.
2242 shares
  • 337

Filed Under: Crafts, Decor, DIY, Gift Ideas, Mirror, Tutorials Tagged With: beads, Craft, Decor, DIY, gift, mirror, paper, tutorial

heatherHeather is a Designer, True Color Expert® and proud military wife at Setting For Four Interiors. Heather offers online Interior Design and Paint Color Services. See all of our design tips & tricks on the blog and follow us on Instagram for more design and decor inspiration!

Comments

  1. Jill says

    April 23, 2012 at 12:54 pm

    Heather – that mirror is stunning! I love the colors you chose and the beads really make it pop!

    Jill

    Reply
  2. The Bold Abode says

    April 23, 2012 at 1:10 pm

    I was SO over sunburst mirrors till I saw yours! This is gorgeous, Heather!!! Was the Medallion very $$$?

    Reply
    • Vanessa Dawne says

      June 15, 2012 at 6:19 am

      I totally agree Heather! I’ve seen so many wood ones but this gorgeous sunburst beats them all. Beautiful creativity. Thanks for a wonderful tutorial. I think I might put up a sunburst now after all. 🙂

      Reply
  3. Melissa says

    April 23, 2012 at 1:20 pm

    Oh my! This is gorgeous! I love the color palette!!!!! Nice job!!

    Reply
  4. Lauren says

    April 23, 2012 at 1:32 pm

    loved this easy diy project!

    Reply
  5. Amy says

    April 23, 2012 at 1:35 pm

    Flawless execution, as usual. Beautiful mirror! Glad to see your hand make an appearance in yet another post.

    Reply
  6. Claire @ a little something in the meantime . . . says

    April 23, 2012 at 2:10 pm

    Amazing, amazing, amazing!!! This is gorgeous, Heather and such a unique take on all the sunburst tutorials I saw last year. How long do you think it took you to make this?

    🙂

    Reply
  7. Katie Goldsworthy says

    April 23, 2012 at 3:16 pm

    That turned out awesome!!!

    –Kaite

    Reply
  8. Our Pinteresting Family says

    April 23, 2012 at 3:17 pm

    What a great idea to use scrapbook paper and beads! This is my favorite sunburst mirror idea yet!! Megan

    Reply
  9. Laura says

    April 23, 2012 at 6:03 pm

    Heather,

    Good job with your sunburst mirror. I know they are all rage, and I just can’t help loving them too.

    🙂

    Thanks for sharing,
    Laura

    Reply
  10. Lauren says

    April 23, 2012 at 7:25 pm

    Stopping by. Amazing craft! I love how you can customize this to your color scheme so easily. I’m you’re newest follower!

    Reply
  11. Budget Design Girl says

    April 23, 2012 at 9:11 pm

    Ok, that is without a doubt, the CUTEST starburst mirror that I have yet to see!!! Here via BNOTP. Now I am following you for sure! Keep up the inspiring projects! The rest of us need something to shoot for! 😉
    Have a great week!
    xo-Lisa

    Reply
  12. Anne says

    April 24, 2012 at 12:05 am

    That is gorgeous!!

    Reply
  13. Johanson Family says

    April 24, 2012 at 2:32 am

    I wish I had this kind of imagination for making things in my home!! Beautiful!! Great job! I am now following you & looking forward to getting to know you here and on facebook 🙂

    Reply
  14. Maureen Hayes says

    April 24, 2012 at 11:23 am

    This is one of the prettiest sunburst mirrors I have ever seen. Thanks for the great tutorial as well, I actually think I could make one because you explained it so well! Another post I will be bookmarking to make!

    Thanks!

    Reply
  15. Sarah says

    April 24, 2012 at 12:15 pm

    Wow that turned out amazing! I can’t believe it’s just scrap book paper around the outside.

    Reply
  16. Vintage Mauve says

    April 24, 2012 at 2:06 pm

    This turned out amazing! I adore the bead detail you did around the mirror. So very thought out.

    Thanks so much for sharing! I’ve been following your site for a while now. 🙂

    Reply
  17. Shannon says

    April 24, 2012 at 3:36 pm

    This is so pretty, you did a great job!

    I’m a new follower:)

    Reply
  18. chelsea says

    April 25, 2012 at 12:47 am

    A much better use for a ceiling medalion! Lovely project 🙂

    Reply
  19. AJoy says

    April 26, 2012 at 2:58 am

    Very pretty! I like using media for things other than what they were intended.

    Great job!

    Reply
  20. JENNY K. says

    April 26, 2012 at 4:13 am

    Really clever idea!

    Reply
  21. diana says

    April 26, 2012 at 2:12 pm

    This is really stunning! Definitely looks like it came from a magazine and that you had to pay an arm and a leg for it. Thanks for sharing! 🙂

    Reply
  22. Lauren says

    April 26, 2012 at 3:57 pm

    WOW!!! Absolutely amazing. It doesn’t look like scrap paper at all— fab work 🙂 Newly following! Blessings

    Reply
  23. [email protected]mail.com says

    April 27, 2012 at 12:21 am

    This is simply beautiful. The use of the scrap paper is ingenious! At first glance I thought it was metal.

    Too cool. Thanks for sharing.

    Reply
  24. Kathleen says

    April 27, 2012 at 4:28 am

    That mirror is too fabulous! Using the scrapbook paper makes the possibilities endless. This was a great tutorial.
    Kathleen, I’m your newest follower. 🙂

    Reply
  25. Nadir says

    April 27, 2012 at 1:06 pm

    Hi! This mirror is stunning! I love the colors & it seems so simple to make too. 🙂 Thanks for sharing!

    Reply
  26. Jean says

    April 27, 2012 at 1:08 pm

    Beautiful job!

    Reply
  27. Lisa says

    April 28, 2012 at 11:48 pm

    Heather that is GORGEOUS!!!! I love the look! Where in your home are you using it?? This may be a fun Sunday project for me soon!

    Reply
  28. Aimee says

    April 29, 2012 at 1:14 am

    Totally Perfect!!! XO, Aimee

    Reply
  29. Miriam says

    April 29, 2012 at 4:17 am

    this is FABULOUS!!! Great work- I never would have guessed that was just scrapbook paper. It looks just wonderful! 🙂 Great Great GREAT job!!

    Reply
  30. Rose Jesky says

    April 29, 2012 at 11:26 am

    I am so in love with this. I will try it! Thanks for sharing this!

    Reply
  31. katy says

    April 29, 2012 at 2:35 pm

    Wow, love your creativity! Thank you for sharing.

    Reply
  32. Jen Lossing says

    April 29, 2012 at 5:18 pm

    Great job! This is so beautiful! It looks like it would costs a fortune! Very chic!

    Reply
  33. Heather Kaluf says

    April 29, 2012 at 8:08 pm

    Absolutely gorgeous! I have pinned it, I want to make one for our home.
    Thanks for sharing!
    xoxo
    Heather

    Reply
  34. Tisha says

    April 29, 2012 at 8:22 pm

    This is so fun! I love your creativity. Thanks for linking up.

    Reply
  35. Christine says

    May 2, 2012 at 5:22 pm

    This is AMAZING!!!!!! I just adore it!!! Fabulous!

    Thanks for sharing this!

    Reply
  36. Kristin says

    May 29, 2012 at 7:59 pm

    This is awesome, So pretty!
    XO
    Kristin

    Reply
  37. Jess @ Spool and Spoon says

    June 9, 2012 at 6:24 pm

    I didn’t even remotely anticipate that you had used PAPER for the rays… how simple is that!? Love this!

    Reply
  38. Meg says

    June 15, 2012 at 2:05 am

    That looks awesome! I thought the paper was metal! What a great idea. Love it!

    Reply
  39. Carolyn says

    June 15, 2012 at 3:55 am

    REALLY nice!

    Reply
  40. Jennifer Dawn says

    June 15, 2012 at 12:06 pm

    This is fantastic! I love all the details!

    Reply
  41. Lisa says

    June 15, 2012 at 12:31 pm

    How pretty! Love the fresh colors you chose and the little sparkles!

    Reply
  42. Sarah Jenkins says

    June 25, 2012 at 9:01 pm

    This is so chic looking! Thanks so much for sharing this project! I hope to see you again tomorrow!

    Sarah

    Reply
  43. Its So Very Cheri says

    July 10, 2012 at 3:39 pm

    I love your mirror. I have been planning a medallion mirror for a while. (I need a clone to get everything done.) I love the paper sunburst–so pretty.
    Cheri

    Reply
    • Heather says

      August 23, 2012 at 2:02 pm

      Cheri – I need a clone too!! If you find how to get one let me know 🙂 Thanks for your compliments girlfriend!

      Reply
  44. Atta Girl Amy says

    August 23, 2012 at 1:38 pm

    I am so copying this! Love, love, love, love, love this!

    Reply
    • Heather says

      August 23, 2012 at 2:01 pm

      Thanks Amy for your sweet comments! I would love to see how your version turns out! Send me a pic of yours when you are finished and I will post it on facebook! So glad you like it – I am really enjoying mine!

      Reply
  45. Heather says

    August 23, 2012 at 2:05 pm

    You’re welcome Joanne! Your version looks fantastic – great job! It is such a compliment that you tried this tute!

    Reply
  46. Sandi Holland says

    September 16, 2012 at 12:57 pm

    I like the way you used your Photobucket slideshow under your header. Have a nice Sunday!

    Reply
    • Heather SettingforFour says

      September 30, 2012 at 2:09 pm

      Thanks so much Sandi for your comments! Have a great week 🙂

      Reply
  47. Heather SettingforFour says

    September 26, 2012 at 2:17 am

    Your welcome!!

    Reply
  48. LiveLoveDIY says

    October 31, 2012 at 7:35 pm

    Stopping by the blog today, Heather! I just love what you do! This is such a smart idea! Love that you used scrapbook paper! Genius! Hope you have a wonderful rest of the week, sweet friend! xo

    Reply
  49. Ashley @ Domestic Imperfection says

    December 29, 2012 at 3:25 am

    This mirror is gorgeous! When I first saw it I thought the rays were galvanized metal, but they are paper! That sounds a whole lot easier!

    Reply
  50. Dewdrop Gardens says

    December 29, 2012 at 12:02 pm

    Wow…wow…incredible! I love this and am pinning!!
    Debbie 🙂

    Reply
  51. Tonya @ Love of Family And Home says

    January 20, 2013 at 7:30 pm

    Gorgeous!! I love this!! Pinned & shared!!

    Reply
  52. Christina at I Gotta Create! says

    February 3, 2013 at 1:31 am

    Beautifully done! Pinning 🙂

    <3 Christina at I Gotta Create!

    Reply
  53. Jeannie and Linda says

    March 21, 2013 at 7:02 pm

    It’s just fabulous!

    Peace,
    Linda

    Reply
  54. Debbiedoo's says

    May 30, 2013 at 1:15 am

    WOW that is so pretty Heather! I love the color too.

    Reply
  55. Toodie says

    August 7, 2013 at 2:03 pm

    I love this one! It’s so pretty and interesting to look at!

    Reply
  56. Gill says

    September 30, 2013 at 4:00 pm

    it’s really beautiful Heather and so unusual, Gill, shooogliecrafts.blogspot.com

    Reply
  57. Pamela says

    October 3, 2013 at 3:27 am

    Heather your mirror turned out gorgeous!

    Reply
  58. Nicole says

    October 16, 2013 at 4:35 pm

    Saw this on pinterest. I agree with the others-not been a huge fan of sunburst mirrors, but yours turned out so beautiful! Well done! I just might need to make one of these now!

    Reply
  59. Melinda Donnell says

    November 8, 2013 at 2:03 pm

    I can not hardly believe that is made out of paper…..How is it holding up? It is beautiful!

    Reply
  60. goldberie says

    November 24, 2013 at 2:11 pm

    Thank you so much for sharing this. I love, love, love it! I just made one for my son and his girlfriend. I appreciated your detailed instructions and materials list. My beads and papers are different, but in the same gorgeous teal colors. What an awesome Christmas present. Thanks again for sharing your creative genius!

    Reply
    • Heather SettingforFour says

      December 30, 2013 at 9:09 pm

      Thanks so much for your lovely compliments! I’m so glad you made one for a Christmas present!! I’m sure your son and girlfriend will love it!

      Reply
  61. I am THAT lady says

    December 29, 2013 at 3:39 am

    This is SO beautiful! Thanks for the tutorial – I can’t wait to try it!

    Reply
    • Heather SettingforFour says

      December 30, 2013 at 9:10 pm

      I’m glad you like it and have fun making your own!!

      Reply
  62. Sinea Pies says

    January 11, 2014 at 1:22 am

    Now, this is gorgeous! You are so talented. 🙂 Blessings, Sinea

    Reply
  63. RosieW says

    January 31, 2014 at 10:35 pm

    Heather, Totally enchanted with this. I’m considering doing this using Mod Podge on the scrapbook to give it some protection. What do you think? Things tend to get really dusty in my house because I leave windows and doors open as weather permits.

    Rosie

    Reply
  64. Brooklyn says

    February 28, 2014 at 5:56 pm

    I’m going to add my comment to the million others you have – this is INCREDIBLE! Thank you so much for sharing! I thought the paper was metal and never thought I could do something like this! This is TOTALLY going on my list to make soon! Thanks for the AMAZING inspiration!
    xo-Brook

    Reply
  65. Katie Adams says

    March 2, 2014 at 3:40 pm

    Gorgeous! What a stunning piece to put in your home. I love it!

    Reply
  66. heather says

    May 27, 2014 at 1:55 pm

    Thanks so much for featuring my mirror Amanda! That’s so exciting that your readers liked it!!

    Reply
  67. MK says

    June 19, 2014 at 10:51 am

    I was inspired by your idea here to create a starburst mirror of my own and wanted to give credit where credit is due. Mine will end up looking nothing like your classy version and its still in the preliminary stages. Thank you for taking the time to write this tutorial and sharing it with us.

    Reply
    • heather says

      June 22, 2014 at 4:14 pm

      Oh I can’t wait to see your version!!! Please email me when it’s finished!

      Reply
  68. heather says

    October 18, 2015 at 5:16 pm

    Oh great Gloria! Have fun making it!

    Reply
  69. Mary Ellen Mandeville says

    January 27, 2016 at 7:36 pm

    I really like this sunburst mirror a whole lot,do you think I could probably come up with
    one in a beach theme version, if so, which other colors could I use, would they be sort
    of subtle metallic colors?

    Reply
    • heather says

      February 1, 2016 at 6:27 pm

      Mary Ellen – you could use blue colors or sandy metallic colors if you’d like a coastal look!

      Reply
  70. Karen R. says

    March 15, 2016 at 7:51 pm

    I love the colors and want to make one for myself, only a little bigger and sturdier. I’m wondering why do you unstring the crystals then restring them on the same elastic string?

    Reply
    • heather says

      April 19, 2016 at 8:09 pm

      Hi Karen – because I used the crystals from 2 bracelets and strung them onto one elastic string – hope that helps!! Thanks for visiting!

      Reply

Leave a Reply Cancel reply

Your email address will not be published. Required fields are marked *

Recipe Rating


Hello! I'm Heather - Designer and True Color Expert at Setting For Four Interiors!
  • Email
  • Facebook
  • Instagram
  • LinkedIn
  • Pinterest
  • Twitter
  • YouTube

HIRE ME FOR ONLINE DESIGN!

True Color Expert®

True Colour Expert - online color design services. eDesign.

Furniture Layout Solutions!

Get your FREE Beginner’s Guide To Interior Design!

Get Your FREE Design Guide Here!

Copyright and Usage Policy

© Heather Luckhurst and Setting for Four Interiors, 2011-2023.
See my Photo Usage Policy here. All images photographed by me and all articles on this website are my copyrighted material and intellectual property. Unauthorized use and/or duplication of this material without express and written permission from this website’s author and owner is strictly prohibited. Absolutely no text or tutorials can be replicated. To request authorization for use of my copyright material, photos, media (video or audio files), tutorials, or ideas contact me via email: settingforfour (@) gmail (dot) com

© 2011-2023 · Heather Luckhurst and Setting for Four · Log in
See my Photo Usage Policy here. ALL images and tutorials on this blog are my copyrighted material and intellectual property. Unauthorized use and/or duplication of this material without express and written permission from this blog’s author and owner is strictly prohibited. Absolutely no text or tutorials can be replicated. Copying my recipes is not allowed. To request authorization for use of my copyright material, photos, media (video or audio files), tutorials, or ideas contact me via email: settingforfour (@) gmail (dot) com | Privacy Policy
GET THE FREE BEGINNER'S GUIDE TO INTERIOR DESIGN & DECORATING!

Design secrets to create spaces you'll love!
By signing up, you agree to receive Setting for Four e-mails. Please see our privacy policy for more information. Although I'd hate to see you go, you may unsubscribe at any time. Your information will never be shared or sold to a 3rd party.
2.2K shares
  • 337Facebook
  • Twitter
  • Pinterest